3-2. PARTS OF A DRAWING
a. Title Block. The title block contains the drawing number and all the information required to identify the part or assembly represented. Approved military prints will include the name and address of the Government Agency or organization preparing the drawing, the scale, the drafting record, authentication, and the date.
b. Revision Block. Each drawing has a revision block which is usually located in the upper right corner. All changes to the drawing are noted in this block. Changes are dated and identified by a number or letter. If a revision block is not used, a revised drawing may be shown by the addition of a letter to the original number.
c. Drawing Number. All drawings are identified by a drawing number. If a print has more than one sheet and each sheet has the same number, this information is included in the number block, indicating the sheet number and the number of sheets in the series.
d. Reference Numbers and Dash Numbers. Reference numbers that appear in the title block refer to other print numbers. When more than one detail is shown on a drawing, dashes and numbers are frequently used. If two parts are to be shown in one detail drawing, both prints will have the same drawing number plus a dash and an individual number such as 7873102-1 and 7873102-2.
e. Scale. The scale of the print is indicated in one of the spaces within the title block. It indicates the size of the drawing as compared with the actual size of the part. Never measure a drawing--use dimensions. The print may have been reduced in size from the original drawing.
f. Bill of Material. A special block or box on the drawing may contain a list of necessary stock to make an assembly. It also indicates the type of stock, size, and specific amount required.
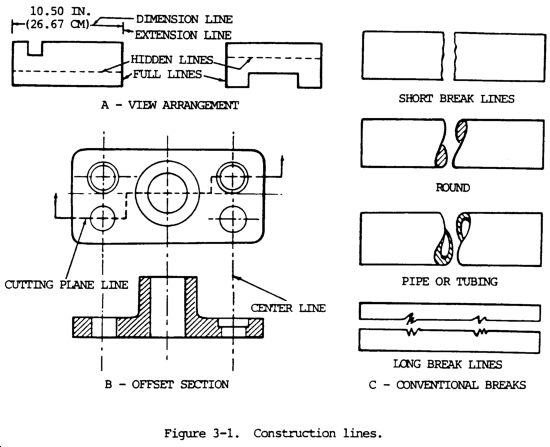
3-3. CONSTRUCTION LINES
a. Full Lines (A, fig. 3-1). Full lines represent the visible edges or outlines of an object.

b. Hidden Lines (A, fig. 3-1). Hidden lines are made of short dashes which represent hidden edges of an object.
c. Center Lines (B, fig. 3-1). Center lines are made with alternating short and long dashes. A line through the center of an object is called a center line.
d. Cutting Plane Lines (B, fig. 3-1). Cutting plane lines are dashed lines, generally of the same width as the full lines, extending through the area being cut. Short solid wing lines at each end of the cutting line project at 90 degrees to that line and end in arrowheads which point in the direction of viewing. Capital letters or numerals are placed just beyond the points of the arrows to designate the section.
e. Dimension Lines (A, fig. 3-1). Dimension lines are fine full lines ending in arrowheads. They are used to indicate the measured distance between two points.
f. Extension Lines (A, fig. 3-1). Extension lines are fine lines from the outside edges or intermediate points of a drawn object. They indicate the limits of dimension lines.
g. Break Lines (C, fig. 3-1). Break lines are used to show a break in a drawing and are used when it is desired to increase the scale of a drawing of uniform cross section while showing the true size by dimension lines. There are two kinds of break lines: short break and long break. Short break lines are usually heavy, wavy, semiparallel lines cutting off the object outline across a uniform section. Long break lines are long dash parallel lines with each long dash in the line connected to the next by a "2" or sharp wave line.
Authorization Letter


